Why this post is here: sometime in 2021, ADOT reorganized what used to be known as the Bicycle and Pedestrian Program’s website, azbikeped.org ; that link still works, but it just redirects to what is now called the ADOT Active Transportation program’s website: activetransportation.az.gov
 The old site contained a full online copy of Arizona Bicycling Street Smarts, a 42 page booklet that contained excellent advice for how to ride a bicycle safely in traffic, among other topics. The bad news is the new site no longer contains that content; the good news is Arizona Bicycling Street Smarts is available in its entirety from archive.org.
Read much more about the long and storied history of the booklet on the author’s webpage.
I became concerned the content would become “lost”; so I archived a copy from archive.org (highly compressed BSS.7z). Here is a sample of chapter 1, just as raw .html. Below is just the beginning of the first chapter — cut and pasted from the raw .html into a wordpress post (which even pasted the image correctly).
Bicycling Street Smarts
1 – OFF TO A GOOD START
Let’s look first at how you get onto your bicycle. If you climb onto it the right way, you get quicker, safer starts and a more efficient riding position. We’ll also take a look at how to get off smoothly so you’re positioned to start again quickly.
STARTING AND STOPPING
When you get onto your bicycle, first stand over the frame in front of the saddle. Hold the brake levers so the bike won’t roll. A steady bike lets you get into position to mount.
Now, using either foot, gently turn the crank backwards until the pedal is at 2 o’clock position – forward and high. If the crank won’t turn easily, carefully adjust the gear levers until the chain runs straight.
Once your foot is on the pedal in the 2 o’clock position, you’re ready to get moving. Let go of the brakes and push down on the pedal. The first pedal stroke starts the bicycle moving and lifts you up to the saddle. When the opposite pedal comes up to top position, put your foot on it for the second pedal stroke.
When you’re coming to a stop, stand on one pedal, and slide forward off the saddle. Lean the bicycle a little to the side and place your free foot on the ground. When stopped, raise one foot and its pedal into the 2 o’clock starting position.
No matter what type of pedals you use (see below), put only one foot on the ground when you stop. The other foot waits on its pedal in the 2 o’clock position, ready for a quick start.
As you slow to a stop, shift down to a low, starting gear. On a derailleur-equipped bicycle, the gears shift only while you’re still turning the pedals – planning ahead pays off.
USING CLIPLESS PEDALS OR TOECLIPS
Clipless pedals, or toeclips and straps, are your “feet belts.” Though not necessary, they increase pedaling efficiency and safety. But learning to use them requires practice. Be sure to master the release motion before using them on the road.
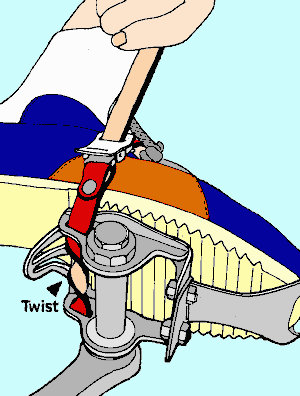 Thread toeclips and straps as shown in the illustration – from the outside to the inside of the pedal. Leave the end of the strap sticking out like a floppy dog ear – don’t tuck it back into the buckle. Tighten the strap by pulling on the end, and loosen it by pushing the buckle outward with your thumb.
Thread a toe strap as shown, from outside to inside of the pedal. Leave the end hanging loose so you can pull it to tighten the strap.
… see the rest at archive.org
Thanks for archiving this!
—Incoming ASU student who would prefer not to die biking to school
There are some REALLY good online training courses out there, I particularly like “Cycling Savvy” — you can start with the free one:
https://www.cazbike.org/savvy/